Disconnect your negative battery post and lay it aside.
Remove all five visible screws from passenger door panel with a Phillips head.
Gently pry up your passenger window switch bezel, separating it from the door panel. Pry the connector off the switch and bezel; remove the handle bezel and the last door panel screw.
Once all 6 door panel screws are removed lightly pull up on the whole door panel assembly to separate the panel from the door. The panel is held on by plastic hook tabs. * Do NOT pry door panel away from door, it slides off in an upwards motion*
Next remove speaker screws. Remove and unplug speaker assembly.
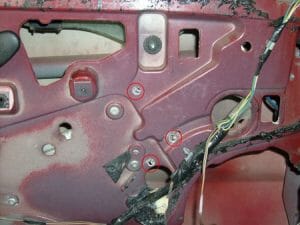
Carefully pull back plastic water guard. You can have it hang down, but pulling it off and setting it out of the way is probably best. Just lay it down with the sticky side up so you can put it back later.
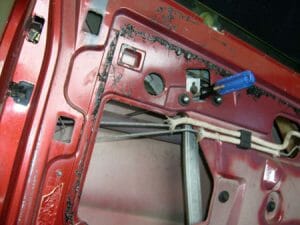
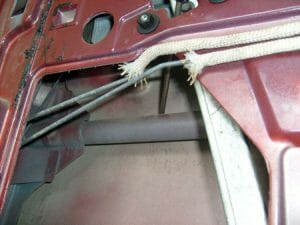
You need to brace the window so that when the motor is removed it does not fall. You can use a c-clamp, or wedge a block of wood. Our preferred method is to position a long screwdriver like the picture shows below.
Now you need to drill out the factory rivets using your drill and the 3/8 drill bit. The door is made of a fiber glass material so try not to breath in or get the dust on yourself. Below you will see the 3 holes circled in red. Using this picture stick your hand in the door and locate the back of the rivets, this will help make sure you are drilling in the right area. **Note: Your goal here is to just drill off the head of the rivet, you do not want to drill a hole through the plate that the motor is riveted to.
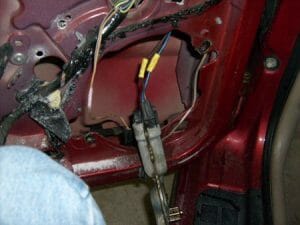
Now you should be able to pull the motor out and have it hanging out of the door. From here unplug the old motor and plug the new one in.
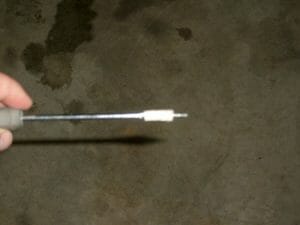
The motor has a pin on the end of the gear, we will call it the gear guide shaft pin. That has to be in the correct hole or the motor will not line up. The motor will rest against the mounting plate flush real easily when it is in there properly. **Note: There is a little metal plate that the motor comes with, this is not used, but shows you a good representation of the whole the guide pin rests in.
Now that the motor is where it goes, you will need to hold it there while getting the screws started. This part is a little tricky and a magnetic screwdriver did not cut the chase. So like the picture below we tapped the screws to the screwdriver using masking tape. As soon as the screw is tight, the screwdriver can be pulled off with no trouble.
We would recommend using lithium grease to grease the track REALLY well, these cars are old and the factory grease is pretty much worthless.
Temporarily plug in your window switch, hook up your negative battery lead, turn on your ignition and test the operation of your window.
Now just follow the directions in reverse and your done
If you are having any trouble with your installation, please feel free to Contact Us. You may also find posts from people who have installed our kits on www.ls1.com helpful, along with community input on your issue.